So, now before I show you what I've come up with to display his art work, I have to admit something. I don't keep all his work. I throw some away. *gasp* I know. Horrible mom, party of 1 right here. But before you go thinking I'm horrible, let me explain. Anything that he's truly MADE, I keep. Like painting projects, actual coloring projects, actual art projects (that require glue, etc), I keep. What I throw away is random stuff that's not really "made" like tear outs from a coloring book that he's scribbled on or letters that he's traced. Call me horrible, but I don't think I need to re put together a coloring book of pages that he's scribbled, so while I'm glad he's had fun at the time, it goes in the trash (when he's not looking, of course) when he's done.
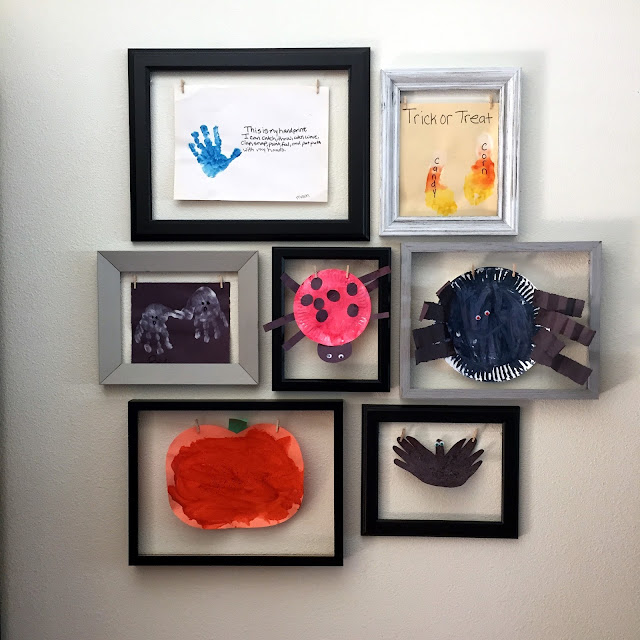
That being said, I have all this art work that Mason's done over the past year at preschool and nowhere to put it, so what did I do? I made an art gallery wall to hang it! Coincidentally the timing was perfect because I had a ton of Halloween/Fall stuff from last year that I had saved that I was able to hang on the gallery wall. For inspiration on how exactly I wanted it to look, I used Sarah's gallery wall and various finds from my Home Decor Pinterest board. As for actual execution of the project, I followed most of the directions from this post.
Here's how you can make a gallery wall of your very own.
Supplies
- frames - quantity and size will depend on your preference
- 1/2 inch eye hooks - similar
- monofilament - I used this
- clothes pins - I used the 1" ones below that I found at Michael's Craft Store
- picture hanging nails - similar
- tools - screwdriver, hammer, pliers, scissors
Step 1: Go shopping for frames. I found my frames at HomeGoods and IKEA. You can definitely find frames at other places like Michael's, JoAnn's, Target, etc but I was looking to keep it cheaper so we bought most of the frames at IKEA. Tip: Know what size art work you're going to want to hang. You might not know exactly what size the art will be (since it hasn't been made yet), but knowing kids, art work is never small. Having said that, I tended to buy more big frames rather than small.
Step 2: Go shopping for supplies. I had most of the tools on hand, so we didn't need to buy those, but I did pick up some monofilament (at ACE Hardware), the clothes pins (from Michael's), and the eye hooks (from Lowe's).

Step 3: Arrange the frames. I knew that most of Mason's art work was using horizontal so I tried to have most of the big frames face this direction. I didn't want them all the same though, so I used some of the smaller ones to go vertically. I rearranged A LOT. Don't settle on your first arrangement. Take a picture and rearrange. This is my third or fourth arrangement. Tip: don't delete the picture after you decide on an arrangement! The husband finds it very helpful when trying to hang the frames on the wall.
Step 4: Remove the glass and the backings from all frames. Discard. All you'll need is the frame itself.
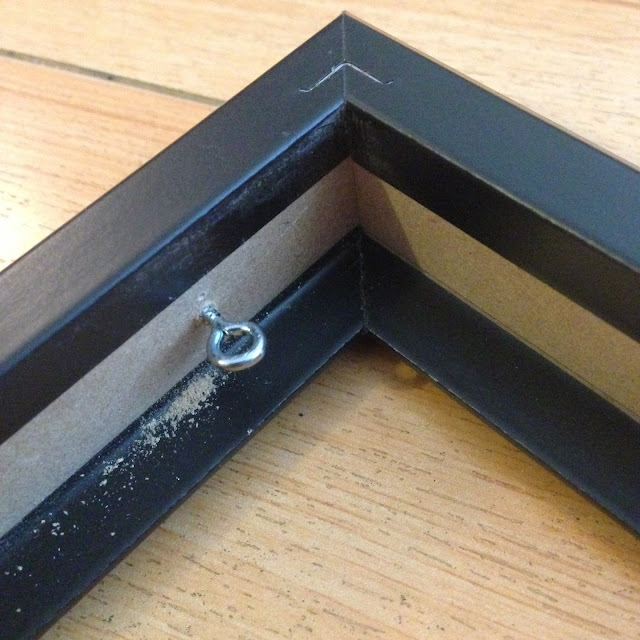
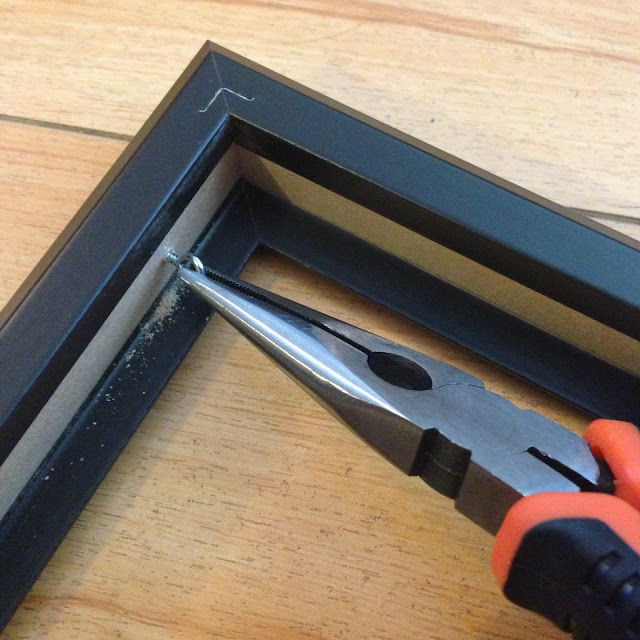
Step 5: Screw in the eye hooks. Measure how far down you want the eye hooks to be. Keep in mind, this is how low the monofilament will hang as well. We measured down 1 inch on each side of the frame and made a little mark so we knew where to put the eye hooks where they would be even. I wanted the monofilament to hang slightly down but not too far, so we basically just gave the clothes pins a little leeway.
Depending upon how hard the wood in the frames is, you may need to use a hammer to get the eye hook started by creating an indent in the wood. Seth had to do that for only a couple of the frames. Then use pliers and screw the eye hooks into the frames.
Step 6: Attach the monofilament and clothes pins. Tie one side of the monofilament to one of the eye hooks. Measure out enough to stretch across to the other side and some extra to allow yourself to be able to tie. Before you tie the monofilament all the way across, string 2 clothes pins on the monofilament. Then tie the other side as tight as possible to the monofilament doesn't sag.
Step 7: Hang the frames on the wall.
Step 8: Hang pictures in the frames.
And you're done! You can definitely color the frames too if you wanted them all to be the same color (as seen in this post). I preferred them all to remain in the colors that we bought them in since I liked the gray and black combination and they coordinated with the other frames that were already in our family room.
I absolutely LOVE the way it looks and can't wait to change out the art work for Thanksgiving!


What a perfect idea! As a teacher, I can say on behalf of many, thanks! We put a lot of time and thought into creating pieces that parents can have. I know, I didn't save everything either. It's impossible to. And if you do, it ends up in boxes, then you have to store years of boxes. The praise is in his accomplishments. I always hung seasonal pieces too. You can make a scrapebook to out of things like yearly handprints, mom/dad special items, etc. You did a great job! I'm sure Mason is proud of his work and knows you are too.
ReplyDeleteI love love love this! I might be stealing this idea very soon! We hang Noah's current projects in our pantry doors, but I like this idea for older projects... Maybe in our basement play area? Oh and I definitely don't keep coloring book pages, don't feel guilty about that.
ReplyDeleteI LOVE this!!! I so have this on my long-term to do list. Pinning for when I have time!
ReplyDeleteJust in time for Connor to go back to school. I've been trying to figure out how I'm going to pick what I keep and what I toss but really, he will have so much that it doesn't really matter. I'm even going to gift some of them to his uncles, aunts and my parents. Love this idea and I think I could actually pull it off!
ReplyDeleteI love it!!!! I definitely like the mismatched frames and colors! And your art on display right now is perfect! Ours needs updated badly, but I just haven't had time! P.S. Thanks for the blog shout out! Happy I could inspire!
ReplyDeleteGreat idea! I throw pictures away regularly, but now that he's in school and will have more, I think I will get an app to keep the memories, and keep favorite or special pieces.
ReplyDeleteOh my gosh, Liz! How perfect is this?! I love how you're displaying his art!! Our fridge is such a mess with Mia's pictures... I gotta do something like this!
ReplyDeleteI love this!! It's perfect for displaying all of his artwork :) I'm sure that wall will be expanding very quickly.
ReplyDeleteliz jo @ sundays with sophie
Love...
ReplyDeleteSUCH a cute idea! Love this!
ReplyDeleteDisplaying childrens art is so sweet and really gives them a sense of pride in their abilities. I made a similar frame with eye hooks and twine but then we moved and it collapsed, tear. Im guilty of recycling certain works of art when the artist isnt looking ;) We dont want to be hoarders either, its a fine line lol
ReplyDeleteOh my gosh - I freaking LOVE THIS!!! What an absolutely awesome idea.
ReplyDeleteWe have a spot right about Marcus' train table that would be just perfect for this!! Now, I'm going to have to recruit Scott to do some of the work. :)
And, I'm right there with you on keeping all the stuff Marcus brings home. The coloring pages? Nah. The real, hand crafted stuff? Yes!
Just adore this idea! Love!
ReplyDeleteI really like this idea! I'm saving this for sure. I definitely want to do something like this in the office area of our next house!
ReplyDeleteThis is awesome! I need to grab some frames next time I'm in the thrift shop and do this for the hallway!
ReplyDeletei dont keep much of lex's. . . . im such a bad mom like that! but this little gallery wall. its DIVINE. i'm kinda inspired to find someplace in our house to house something like it. come over and do it for me? THANKS.
ReplyDeleteElizabeth this looks amazing!!! I love the idea of having the little clips in there to make it easy to change them out.
ReplyDeleteIt looks so great! I love it. Very cute idea.
ReplyDeleteOh it is just SO perfect! What a great idea and you guys did an amazing job. You are going to love this for years and years to come :).
ReplyDeleteGirl, don’t feel bad. I don’t keep everything of Mason’s either. You’d be amazed at how many sheets they bring home on the daily. I keep the special stuff and toss the rest (just not when he’s around!!). But, OMGoodness…I love what you have done here. This is awesome and perfect. I think I want to do this in the hallway that leads to his bedroom. Thanks for sharing this awesomeness!
ReplyDeleteI love how this turned out!!!
ReplyDelete